Why would you want the build your own Camper, it takes a lot of time, you have to buy more tools, you have to find materials and you have to either buy plans or make your own. Then you have to figure out how to run the electrical wiring, you have to figure out what wiring you need and how to hook up all of the appliances. Then there is the plumbing, you need to figure out where to put everything, how to hook up all of the parts and how to make them work.
The biggest reason to build your own camper is so that you end up with a product you can be proud of. In most cases all modern RV’s and campers are called stick and staple built. That means that all framing is put together with staples if there is any framing. If you build your own Camper you will find that a wide crown stapler will be you best friend but at least you can use an adequate number of staples and use an appropriate amount of framing.
I start all of my Camper builds with a floor that is constructed with a lower or bottom layer made of 1/2 inch plywood. This bottom layer is attached to a 2×2 frame with cross joists every 1 foot. Between the joists I put in 1 1/2 styrofoam insulation. On top of the framing I add another layer of 1/2 inch plywood. On the bottom layer of plywood I apply a coating of a product called Rocker Guard. This product is very durable, and it is waterproof.
All of the framing is put together using 3 inch construction screws and the plywood flooring is attached using 1 1/2 construction screws.
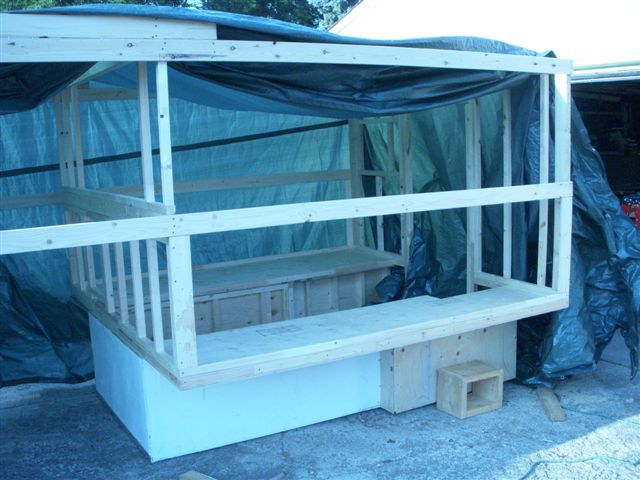
When the floor is built, it will be the shape of the bottom of the camper. From there the walls and roof will sit on top of the floor. The bottom of the walls will follow the shape of the Pickup truck box. The top of the walls above the Pickup truck box will be straight up to the full height of the Camper. The walls are generally framed with 2×2 framing assembled with 3 inch construction screws.
As soon as I build the walls I like to cover them with the panelling that I am going to use on the inside of the camper. This saves a lot of fooling around trying to put small pieces of panelling into the camper and it makes it easy to fasten the panelling. To fasten the panelling I have been using narrow crown staples. But I am thinking I will change to caulking products that are meant for the purpose. With the caulking compounds there is no visible holes in the panelling.
I next install the ceiling panelling of the camper. On top of the ceiling panelling I install the frame of the roof. Again the roof frame is put together using 3 inch construction screws. The roof frame is connected on top of the camper using 3 inch construction screws as well.
The next thing I install is the electrical wiring. You will need wiring for the exterior truck lights, around the top of the camper is generally a set of marker lights that come on when the truck lights are on. Most campers will also have exterior porch lights at the back and if you like you can add backup lights to the camper. On the rear of the camper you will also want signal, tail, and stop lights. If you are going to move your license plate onto the camper you will also want to add a circuit for a license plate light.
In the camper I wire all of the interior light circuits, fan circuits and any 110 volt circuits that I am installing. Make sure to pick a location for an electrical panel for the 110 volt circuits and a place for the shore power connection for the camper. Don’t forget if you are adding solar panels to the roof you need wiring for them as well. You will also need wiring for CO detectors and propane detectors.
At this point you will want to decide where you are going to locate your fresh water tank, your gray water tank, you black water tank and your propane tank. Wherever you put your propane tank you need to run a line to your stove, your furnace, and if you have one a hot water heater and your 3 way fridge.
Once you have all of your electrical wiring run, your propane lines run and your plumbing lines run you can put on the outer siding and insulate the rest of the camper. Install the styrofoam insulation in all of the spaces between the framing of the camper, then attache the outer sheathing using 1 1/2 construction screws. For the outer sheathing of the camper I like to use 1/4 inch plywood.
On the outside of the camper you will be adding siding, roofing and trim. The first thing to install is the siding. It can be sheet metal siding that installs in strips and is screwed in place, or it can be Filon or flat sheet metal that gets glued in place. Once the siding is installed it is time to put on the roof. I use a single piece of sheet metal and it is glued in place on the roof. Once the roof is installed it is time to add the trim to the camper. And last but not least is the installation of the lights, and the fittings for the fresh water, the grey water tank, the black water tank, the shore power and the connection for the truck lights.
At this time I also install the vents and the windows. I cut all of the holes in the walls and roof using a router with a trim bit. It leaves a clean truck of the exact size I need. But it does make a lot of sharp metal shards. Proper PPE is a must for this operation.
